Ajouter des photos à un plan (Android)
Éléments à considérer
-
Permissions d'utilisateur requises :
-
Pour ajouter des photos à un plan, Permissions « Lecture seule » ou supérieures dans l’outil Plans du projet ET permissions « Lecture seule » ou supérieures dans l’outil Photos du projet.
Remarque : Les utilisateurs disposant de permissions « Lecture seule » sur l’outil Photos ne peuvent sélectionner que les photos qui existent déjà dans l’outil Photos, tandis que les utilisateurs disposant de permissions « Standard » ou « Admin » peuvent également ajouter de nouvelles photos. -
Pour publier des annotations personnelles dans la couche Publié, « Standard » ou « Admin » sur l’outil Plans du projet. Voir Quelle est la différence entre les annotations personnelles et publiées?
-
-
Information supplémentaire :
-
Les photos ajoutées aux plans apparaîtront également dans l’outil Photos dans un album « Photos à partir de plans ». Le champ « Origine » sur les photos indiquera quand une photo a été téléversée à partir de l’outil Plans.
Remarque: Les photos d’une annotation n’apparaîtront dans l’album « Photos issues de plans » que si l’annotation a été publiée.
-
-
-
Le nouvel affichage et le nouveau flux de travail s’appliquent désormais à la fois aux bons de commande et aux contrats de sous-traitance.
-
Les détails tels que les descriptions, les inclusions et les exclusions peuvent être développés ou réduits pour garder l’affichage propre.
-
La ventilation des coûts et les ordres de changement sont désormais organisés en sous-onglets indépendants, ce qui réduit le besoin d’un défilement excessif.
-
Les pièces jointes sont affichées en haut de l’engagement pour un accès rapide.
-
Cet item peut être visualisé ou modifié hors ligne s’il a été précédemment visualisé et mis en cache sur votre appareil mobile. Les tâches effectuées en mode hors ligne sont synchronisées avec Procore une fois qu’une connexion réseau est rétablie.
-
-
Accédez à l’outil Plans à l’aide de l’application Procore sur un appareil mobile Android.
-
Appuyez sur le plan auquel vous souhaitez ajouter une photo.
-
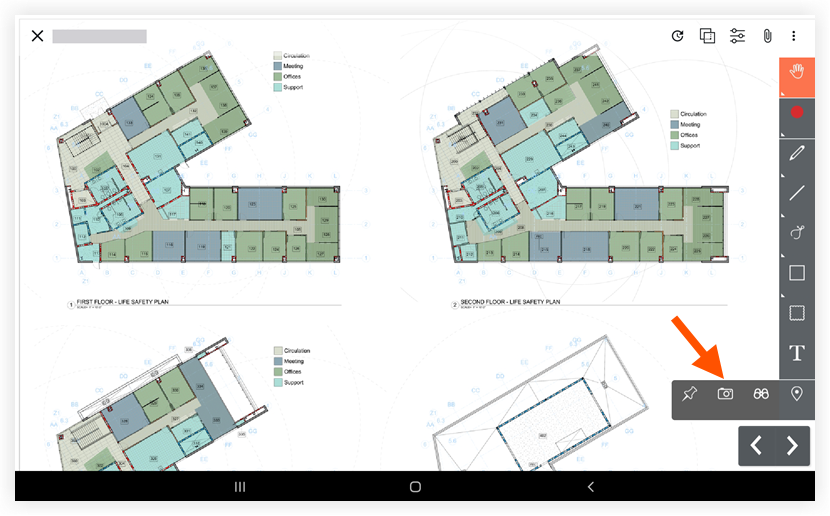
Sélectionnez l’icône de l’appareil photo dans la barre d’outils Annotation ou sélectionnez une icône d’annotation de l’appareil photo existante dans le plan pour ajouter des photos supplémentaires au lieu. Voir l’image ci-dessous :
-
Appuyez sur l’emplacement du plan où vous souhaitez placer des photos.
-
Choisissez parmi les options suivantes :
-
Choisissez parmi Procore : Appuyez sur cette option pour sélectionner une photo existante dans l’outil Photos de votre projet.
-
Choisir dans la bibliothèque: Appuyez sur cette option pour sélectionner un fichier photo dans la bibliothèque de photos de votre appareil mobile.
-
Appareil photo: Appuyez sur cette option pour prendre une nouvelle photo avec l’appareil photo de votre appareil.
Remarque : Vous pouvez déplacer l’icône de l’appareil photo après avoir ajouté des photos à votre version personnelle, mais vous ne pouvez pas déplacer l’icône une fois que vous avez publié les photos de manière à ce que tout le monde sur le projet puisse les voir sur la version publiée. Quelle est la différence entre les annotations de plan personnelles et publiées?-
Prenez une photo sans annotation.
-
Appuyez sur l’obturateur pour prendre une photo.
-
Appuyez sur X.
-
-
Prenez une photo avec annotations.
-
Appuyez sur l’icône d’annotation
 pour prendre la photo et l’annoter immédiatement.
 -
Appuyez sur l’obturateur pour prendre une photo.
-
Appuyez sur Enregistrer comme nouvelle photo si vous souhaitez enregistrer à la fois la photo d’origine et la photo annotée.
OU
Appuyez sur Écraser si vous souhaitez uniquement enregistrer votre photo annotée. -
Appuyez sur X.
-
-
-
-
Facultatif : Appuyez sur Publier pour publier des annotations de plan personnelles auxquelles votre équipe peut s’y référer.
-
Facultatif : Affichez les photos que vous avez liées en sélectionnant l’outil d’annotation Sélectionner et en appuyant sur l’icône de l’appareil photo dans le plan.
-
Facultatif : Affichez toutes les photos que vous avez ajoutées aux plans dans l’outil Photos de l’album « Photos des plans ».